Tuesday, October 29, 2019

Announcing QLab 4.5

Check out Qlab's Latest Update! Its Illuminating! (pun intended!) 


Direct from Qlab's New Site www.Qlabapp.com


Announcing QLab 4.5

We’re very pleased to release QLab 4.5, which brings a number of new features, free for all v4 license holders.
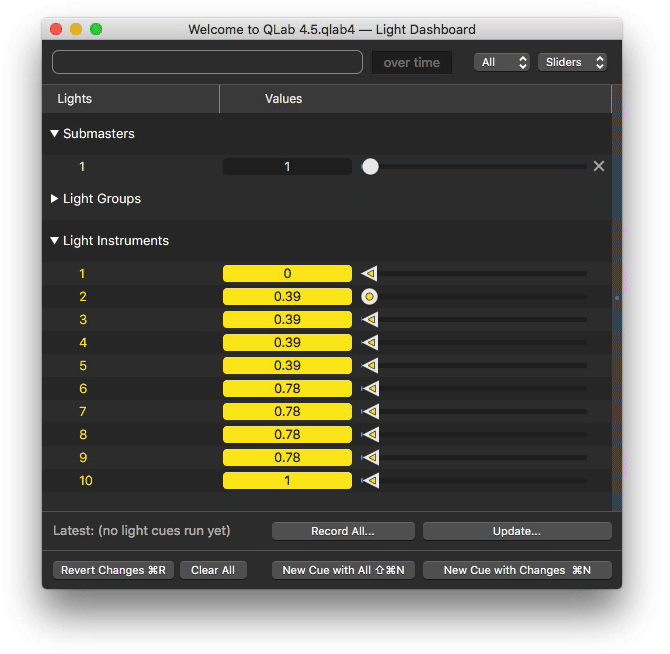
Light Submasters

Any Light cue can now be used as a submaster in the Light Dashboard. When a light cue appears as a submaster, it will appear with a scaling factor between 0 and 100. You can adjust this up or down to scale all the lights in the cue relative to that factor. The values set by submasters are treated in a “highest value takes precedence” manner with respect to Light cues. Thus, any lights brought up by submasters will be at least at the level specified by the submaster. They can not be faded to a lower value by Light cues until the submaster is brought down.
Light Submasters in QLab 4.5

Virtual Parameters, Color Pickers, and Pan/Tilt controls

You can now create “virtual” parameters out of an instrument’s raw parameters, which allow you to use a single control to modify several parameters at once. For example, if you have an RGB light you can create a virtual color parameter which combines the raw red, green, and blue parameters into a single “color” parameter.
Virtual parameters appear as custom controls on the right side of the light dashboard and the light cue levels tab of the inspector.
We have updated the instrument definitions shipped with QLab to include these new virtual parameters, but if you open an old workspace you will need to manually update the instrument definitions in the workspace to access the new controls.

Scaled Light Pulls

Previously, a light command like “all = cue 10” would set exactly the values specified by light cue 10. Now, you can scale the values of cue 10 between 0 and 1 when they are pulled into another light cue.

QLab 4.5 Release Notes

★ Stars denote major new features.

New Lighting Features

ADDED
Light Submasters. Any Light cue can now be used as a submaster in the Light Dashboard. 
ADDED
Virtual Parameters, Color Pickers, and Pan/Tilt controls.
ADDED
Scaled Light Pulls. You can now scale the values of a light cue between 0 and 1 when they are pulled into another light cue.

OSC Library Additions

ADDED
/workspace/{id}/go/{cue_number} and /workspace/{id}/go {cue_number} which allow setting the playhead to the specified cue and then triggering a GO on that cue in the same action.
ADDED
/cue/{cue_number}/setDefaultLevels/cue/{cue_number}/setSilentLevels, and /cue/{cue_number}/setLevelsFromTarget which replicate the behavior of the "Set Default Levels" and "Set All Levels Silent" buttons in the Audio Levels tab of the inspector for Audio, Video, and Mic cues and the "Set from Target" and "Set All Silent" buttons for Fade cues.
ADDED
/cue/{cue_number}/setGeometryFromTarget which replicates the behavior of the "Set Geometry from Target" button in the Geometry tab of the Fade cue inspector.

Workflow Improvements

ADDED
Support for dragging multiple cues simultaneously within a cart.
ADDED
Support for creating multiple cues at once in a cart by dragging in files or a folder from the Finder.
ADDED
Inspector windows can now be floated above other windows.
ADDED
Support for batch editing Network cues.
ADDED
Support for background color formatting for Text cues.
ADDED
Text cue OSC and AppleScript hooks for setting background color, strikethrough color & style, and underline color & style.
ADDED
The Light Patch now has an “Output” column to show which USB device or Art-Net settings are in use by each instrument.
CHANGED
All light definitions which include pan and tilt now use 50% (center) as the home values for those parameters.
CHANGED
The popped-out inspector panel can now be duplicated into a secondary cue inspector.
CHANGED
The audition window’s “Keep window on top” option has been renamed to “Float”.
CHANGED
The audio level output fields will now constrain the displayed output level to the maximum value allowed by the workspace audio settings.
CHANGED
The Rate field in the Time & Loops tab of the Audio and Video inspectors, and the Audio Effects tab of the Fade inspector, now sets the the cue’s rate to 1.0 when using option-click.
CHANGED
When importing .gobutton and .gobundle files, cues that can be imported as just Audio or Wait cues are no longer nested inside Group cues.
CHANGED
Light cue OSC method /cue/{cue_number}/removeLightCommandsMatching {string} now requires a match on the full text of the light command string. Previously, {string} only needed to match the instrument or group name to remove a command. This change also fixes a bug which caused QLab Remote to be unable to delete certain light commands from the Light cue inspector when connected to QLab 4.4.x.
CHANGED
AppleScript command "removeLightCommandsMatching" removes the parameter "selector" and replaces it with a new parameter "command". Like the OSC method of the same name, this command now performs matches on the full text of the light command rather than just the instrument or group name. In the Text cue inspector, you can now option-click on the font, text color, or background color panel toggle buttons to reset that attribute to the default format.

New Light Instrument Definitions

ADDED
Altman AP-150 RGBW LED Par.
ADDED
Chauvet COLORado Solo Batten, COLORado Solo Batten 4, Maverick MK3 Profile, and Maverick MK3 Spot.
ADDED
CLF Apollo, Orion, and Spectrum P2.
ADDED
ETC Relevé.
ADDED
GLP Highlander and Impression E350.

Bug fixes

FIXED
A bug introduced in 4.4.0 when pasting multiple cues into a cue cart that could cause the new cues to be placed non-sequentially.
FIXED
Integrated fades that are not locked to the start/end of Audio and Video cues are now displayed correctly in the Timeline tab.
FIXED
You can now use the same Syphon source in multiple Camera cues.
FIXED
Several issues when batch editing Wall Clock triggers in the "Triggers" inspector tab.
FIXED
Batch editing the Camera cue "patch" value in the "Display & Geometry" inspector tab now updates all selected cues.
FIXED
Scrubbing a still image Video cue with a duration in the active cues panel will now work.
FIXED
Attempting to set an invalid cue color name via AppleScript or OSC no longer sets the cue color to grey.
FIXED
A bug that could prevent update messages from being sent to QLab Remote after changes are made to the Light Dashboard in QLab.
FIXED
Paste Cue Properties now properly clears out previous gang entries.
FIXED
Fade Cue Templates now show tabs for Video Geometry and Video Effects.
FIXED
Broadcast mode has been enabled for outgoing UDP messages.
FIXED
Strikethrough formatting for Text cues is now visible during playback.
FIXED
Text cue now uses the Text cue template to derive default font attributes.
FIXED
Text cue font properties are no longer reset to the default format after using OSC or AppleScript to set the "live text" of that cue to an empty string.
FIXED
The Fade cue inspector now shows the proper tabs when setting its target to a Video, Text, or Camera cue.

Monday, October 28, 2019

What you will need to run QLab

What will you need to run Qlab?
First and most importantly a Mac Computer... Qlab's website added these optimal specifications to get the best performance out of your system.

The below info is directly from Figure 53 (the creator of QLab) 

System Recommendations
Overview
QLab 4 is a Mac-only program. It requires Mac OS 10.10 or higher, and will work on any Mac that can run 10.10.

Because of QLab's great flexibility and the varied scenarios in which it is used, it can be difficult to determine ahead of time how much computer power a given QLab workspace will require. What follows is a discussion of general concepts surrounding processor, GPU, RAM, and hard disk use for QLab. Please take this information not as a firm set of instructions about what to do, but rather as a set of recommendations about what to consider.

QLab is not supported on "hackintoshes" at all. Please do yourself a big favor, and just keep away from those. QLab is likewise not supported in a virtual machine environment.

Processor
The more work QLab needs to do, the happier it will be with a more powerful processor. Large numbers of audio or video cues playing back simultaneously, for example, benefit from an i7, i9, or Xeon processor which have better handling of multithreading tasks than i3 or i5 processors. Processors on Macs cannot be upgraded after they're purchased, but most Macs let you select from several processor options at the time of purchase.

GPU and VRAM
For audio-only users, GPU considerations are fairly negligible. For video folks, what you need depends entirely upon what you're trying to accomplish. Mac Minis, for example, can drive two HD displays simultaneously; one for your operator and one for your projector. Since those two displays share a single integrated GPU, you can improve overall performance by lowering the resolution on your operator's display; the computer will be doing less work for the operator's display, which means more power is available for video crunching. If you use a Mac Pro "cheese grater" tower (that is, pre-2014), dedicating one modest video card for your operator display and one higher-end card for each projector, or one card per two projectors, is a good strategy. For the newer "trash can" Mac Pro, all graphics connections are on the same GPU, which is much more powerful than its predecessors. Testing is, as always, important.

For those seeking best-possible video performance, a Mac with a discrete GPU is the way to go. The Mac Pro, iMac Pro, some MacBook Pro models, and a few other iMac models have discrete GPUs.

For Macs with an integrated GPU, which is all Mac Minis, the MacBook, all MacBook Airs, most iMac models, and most MacBook Pro models, the GPU uses a portion of system RAM as VRAM. The size of this portion is based on the total amount of system RAM installed, so the more RAM you have, the more of it will be used for VRAM. While we don't recommend using a Mac with an integrated GPU for video-intensive shows, if you do use such a Mac we strongly encourage you to install the maximum possible amount of RAM.

RAM
Loading and playing cues uses RAM, so the more audio or video that needs to be loaded at any given moment, the higher the RAM requirement will be. 4 GB should be considered the minimum. As with processing power, complex shows can benefit from (and may require) more RAM. QLab 4 is able to address as much RAM as your Mac can provide.

Disk
QLab is happiest with a solid state drive (SSD) because they are, to put it plainly, really really fast. The more data you're pulling off your disk and pushing out of your speakers or projectors, the more an SSD is a good idea. We do not recommend using a traditional spinning hard disk at all, but if you do use one, it ought to be rated at 7200 RPM.

Check out this amazing drive on Amazon 

Apple's Fusion Drive, though it technically includes an SSD, is not recommended for use on a show computer under any circumstances, as the user has no control over which data is stored on the SSD portion and which is stored on the hard disk, nor any say in when the Mac decides to shuffle data between the two.

Video Output
The best way to output video from QLab is to use the built-in video connections on your Mac (including PCI cards on "cheese-grater" Mac Pros.) Using a Pro Video or Pro Bundle license, you can also output video directly to Blackmagic Design's DeckLink, Intensity, and UltraStudio devices, 

although this comes at the cost of a reduction in CPU performance and an increase in latency.

Macs with Thunderbolt 3 ports running macOS High Sierra and later can make use of devices called eGPUs, which are discrete GPUs in external cases connected via Thundertbolt 3. While we have no hard data on these devices, our understanding is that they work well with QLab as long as your projector or display is connected to the video output on the eGPU itself.

We do not recommend, nor do we support, video output via DisplayLink USB-connected monitors and video adapters. While these devices can work, they are not GPU accelerated and their drivers do not have a solid history. Your mileage may vary, but Figure 53's position is to avoid using these devices entirely.


©2019 by Qlab Tutorial. “Figure 53® and QLab® are registered trademarks of Figure 53, LLC. Justino Zoppe Qlab Tutorials are not affiliated with Figure 53, LLC and this has not been reviewed by Figure53”


Friday, October 4, 2019

Options for using Video with Qlab, and the adapters you will need.

When you want to use Video in your presentations than Qlab is a one-stop shop, but you will still need adapters to connect to the actual gear you will be using, and of course a video license from www.Figure53.com

Like any task, there is more than one way to accomplish it, if you are trying to have 3 screens on stage, there are three ways that I usually choose to go depending on the venue, show & budget.
the simplest and most affordable way for 3 screens is

OPTION #1
Video Projection and then a single High-Quality Projector (Christie etc) in the back of the house, (usually provided by the venue) to project across all 3 surfaces in one shot, then just use Qlab to projection map each surface and voila done! You have the illusion of 3 screens.. however, this does lower the quality of each individual surface, if its just backdrops logos, video effects, and your main projector is a high-quality HDMI and hopefully 10,000 lumens or more, (brightness) then this is a perfect scenario to use a single HDMI out of your mac to do all of this.

However! if the main projector is only a 3,500 Lumen, or VGA and low resolution, this will make each surface low quality and dim.


Option #2,
Use 3 affordable projectors, minimum 3,500 Lumens each. (now you have 10,500 lumens on stage!)
and you will need a Matrox Triple Head Splitter  https://amzn.to/30MAYYH
to turn a single video out of your mac into three... YES, THREE! I have been using these for years and they are amazing!


OPTION #3
LED WALLS definitely my favorite, due to the fact with Projection you are always battling lighting and video, too much light washes out video.. so you cant have a follow spot aimed at you and then stand center stage in front of the projector because the spot will wash out all projections as it is brighter than the projector.  this doesn't happen with LED walls, in fact when I have outdoor events I always rent a LED wall system, because it can be in direct sunlight and still looks amazing!


The cool, thing is you can create any shape you want with the walls, so the image you see above for my secrets revealed show, as you can see has huge led columns and a large back wall (also 2 side screen not shown in this photo) but all three screens in this image are only one surface! that's right ONE HDMI OUT! Qlab sees it as one surface and then I pixel mapped each column as a separate surface creating the image you see above. 

I have made a wish list link attached with the adapters you would need to connect video to Qlab, 
always choose APPLE adapters, it may work fine in most venues to use cheap knock offs, but many times I have run into issues where the venue uses converters or scanners that the signal has to go thru and only true apple products will 100% of the time work... trust me I learned the hard way.. you don't want to be panicking minutes before showtime and video has failed! 

Good luck and if you have any other questions free to book a one-on-one consultation online at : 


List of Tech needed for a QLab Show Control

So I'm assembling a list of Tech that I have tested and used in my shows, that work for the Macbook Pro with USB-C: VIDEO ADAPTER...